Zero to 1 with Label Studio

Introduction
Welcome to the world of data labeling and one of the most popular open-source tools. From here on out, we’ll be exploring what Label Studio is, its role in the machine learning process, and a few different use cases of how it can be used. After we have the bases covered, we’ll get our hands dirty and walk through how to install Label Studio, work with your first data set, label images, and export the annotations you’ve made.
Don’t fret — zero prior experience is required to get started today. Whether or not you’ve written a line of code or created a machine learning query in your life — our goal is that you can follow along and learn something new regardless of your level of expertise.
What you'll need
For this tutorial, we’ll keep things simple. The two requirements for you to get started are:
- You need to have Docker installed on your machine.
- You need to have some base-level familiarity working with the command line to launch Unix-style programs on your computer.
This tutorial won’t require a lot of horsepower and is designed for you to follow along on a laptop.
What is Docker?
Docker is a tool that creates containers to develop, ship, and run applications. One perk to using Docker is that it doesn’t require you to install new software onto your machine natively. Instead, it creates isolated environments for running and testing common applications. It’s quickly becoming one of the preferred ways of delivering applications at any scale, from simple laptop deployments to enterprise infrastructure.
New to Docker or building in containers? Check out their documentation, this handy video created by TechSquidTV explaining the basics of Docker containers, or FreeCodeCamp’s Learn Docker for Beginners tutorial.
Ready for some open-source data labeling fun? Let’s begin!
What is Label Studio?
Label Studio is an open-source data labeling tool for labeling, annotating, and exploring many different data types. Additionally, the tool includes a powerful machine learning interface that can be used for new model training, active learning, supervised learning, and many other training techniques.
But wait, what is data labeling?
Data labeling (sometimes referred to as data annotation or dataset development) is an important step in your data science or machine learning practice. By adding meaningful information to your data through labeling, you can improve the accuracy of your models, identify and remove bias, and improve the efficiency of your machine learning and data science operations.
Within the context of machine learning, let’s take a look at where data labeling fits in this process.
- Defining the problem and gathering the data: The first step is to understand the problem that the machine learning model is intended to solve and identify and collect the data that will be used to train and test the model. This data should be relevant to the problem and be large enough to provide the model with the information it needs to learn.
- Preparing the data: This step involves cleaning, formatting, organizing, and labeling the data so that it is ready to be used to train the model. This may include normalizing the data, removing missing data points or outliers, and splitting the data into training, validation, and test sets. Accuracy can also be improved by combining machine learning predictions with annotations from multiple domain experts to establish consensus and identify possibly difficult data items.
- Choosing a model and training it: Once the data is prepared, the next step is to choose a model that is appropriate for the problem and train it using the training data. This will involve selecting appropriate algorithms and parameters and configuring the model to learn from the data.
- Evaluating the model: After the model is trained, it is important to evaluate its performance on the validation and test data. This step allows you to determine how well the model can generalize to new data and to identify any issues or areas for improvement.
- Fine-tuning the model: Based on the evaluation results, the model may need to be fine-tuned by adjusting the algorithms and parameters or by collecting additional data. This feedback loop can require the addition of new labeled data, and the labels and labeling processes themselves may be fine-tuned. This step may need to be repeated multiple times until the model's performance is satisfactory.
- Deploying the model: Once it performs well, it can be deployed and put into production. This may involve incorporating the model into a more extensive system or application and monitoring its performance in real-world scenarios.
- Continuously monitoring and updating: Even after the model is deployed, monitoring its performance and accuracy is important. Without regular updates, models can drift in the effectiveness of their predictions. Preventing this requires collecting new data to test and retrain the model as necessary. New, accurately labeled data is a critical component of this ongoing process.
Terminology
Throughout this guide, you may encounter terms or tools that you may be unfamiliar with, or that may be specific to Label Studio. Here’s a quick guide to help you get more familiar with the terminology used.
Finding data to label
For the sake of this exploration — we’ll be working from an open and well known dataset. We’ll be using the IMDB Dataset provided by Andrew Maas (ref). This is a very large dataset, with over 100,000 reviews. For this tutorial, we will use a much smaller sampling of only 100 reviews, but this will give you a flavor of how you can organize a large dataset for distribution for your labeling team. At the end of this article you can find a description of the complete data set, and how we prepared it for this tutorial.
Supported Data Types in Label Studio
One of the community’s most loved features of Label Studio is the ability to handle a multitude of different file types in the same platform. Label Studio has you covered from text, audio, image, or even video and time series data.
The file type may change depending on your use case and the project you’re working with.
It’s important to understand what file type is best for your goals and how to format your data best to prepare it for labeling.
This tutorial aims to prepare the data for training a sentiment analysis model for movie reviews. Sentiment analysis is one of the most popular use cases for data labeling and machine learning. This falls under a category of machine learning known as Natural Language Processing, or NLP.
A bit more about NLP
NLP is commonly used for text-based datasets to help computers interpret language. You’ve likely encountered the byproduct of NLP when interacting with a chatbot, navigating and detecting trends, assisting and empowering search engines, and many other text-based scenarios.
Data preparation tips:
When importing data into Label Studio, there are a few things to keep in mind. Here are some tips from our very own Solutions Engineer, Abubakar Saad, for folks just getting started with data labeling:
- Take the time to prepare your data: look for inconsistencies, flaws, or errors that may lead to inaccurate results.
- Provide documentation: show your work, share where the data came from, and how you cleaned the data.
- Check your work: when cleaning up data, it’s easy to get lost in a step. Take time to regularly check your work to ensure the validity and accuracy of your dataset.
If you’re curious to know more, we’ve included a section at the end of this tutorial that describes how we prepared the data and provides the scripts we used to process the data set.
Installing Label Studio
You can get up and running with Label Studio in many ways (check out our docs on how to install it via pip, Ubuntu, Anaconda, or directly from the source). In the next few steps, we’ll install Label Studio via Docker.
Begin by installing Docker. The Docker community has great installation instructions for almost every common platform, and their desktop version can get you up and running fast.
Once you’ve got Docker set up, let’s dive into how to install Label Studio on Docker.
Open up your terminal and run the following command:
# Run latest Docker version
docker run -it -p 8080:8080 -v `pwd`/mydata:/label-studio/data heartexlabs/label-studio:latestThis will download the latest open source release of Label Studio, launch it inside of a Docker container, and make the interface available through a web browser on your local machine. After Docker has loaded the application, you can navigate to http://localhost:8080, where you’ll be greeted with the login screen for Label Studio.
You’ll need to create a new user account, then log in with that information. As long as Docker is running the Label Studio application, you can return to the interface at any time and resume where you left off using your login credentials.
Creating your Project
The first time you log in to Label Studio, you’ll be presented with the Projects Page, which is the home base for all your data labeling projects. You’ll be able to create new projects, edit or revisit existing projects or even invite teammates. This will become your default view, presenting you with all of the projects you have access to.
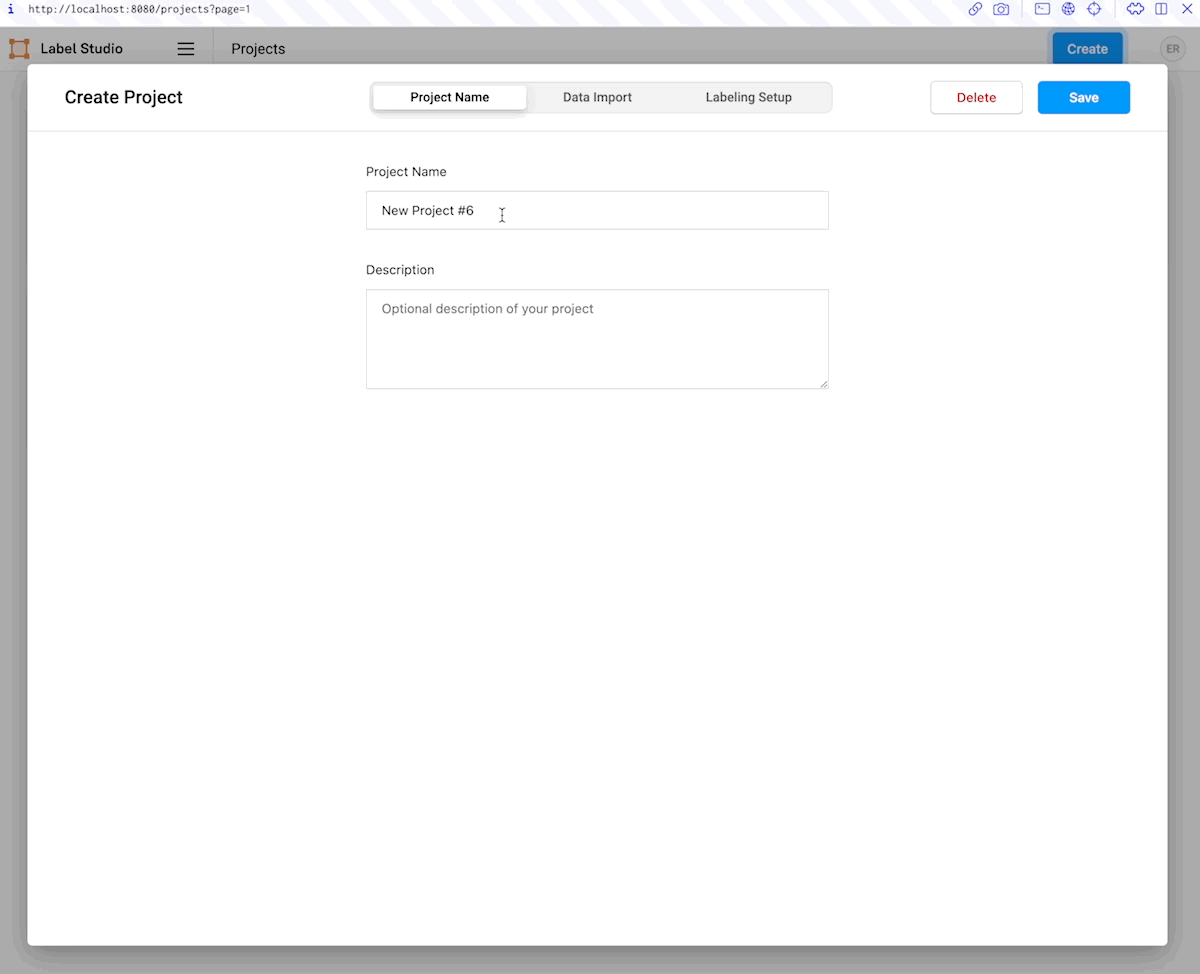
Click on the blue button in the upper right-hand corner of your screen to create a new project.
The project creation panel will present you with three tabs. In the first tab, “Project Name,” you can name and describe the project. In this case, we can call it “Movie Sentiment Analysis,” with the description “My first labeling project.”
Importing your data
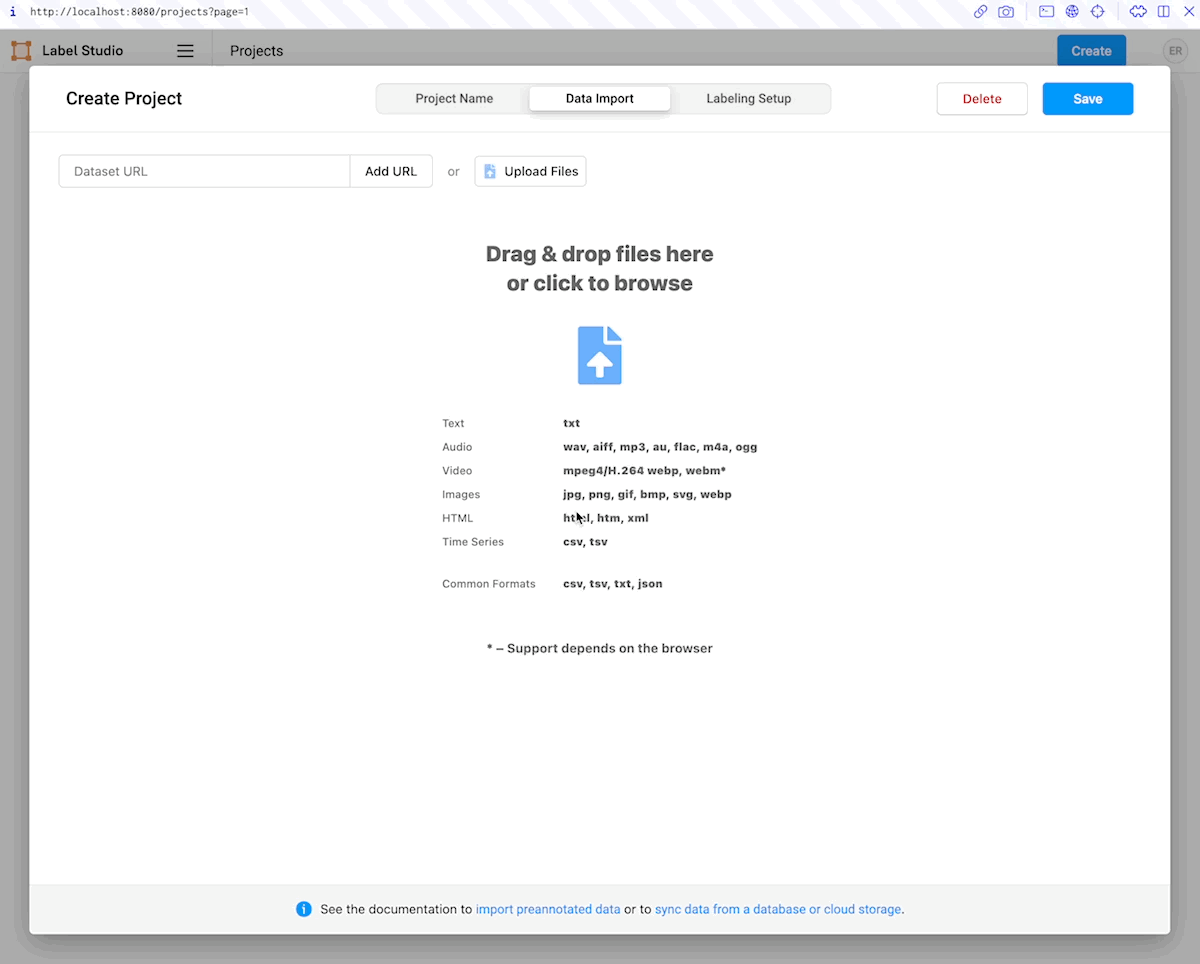
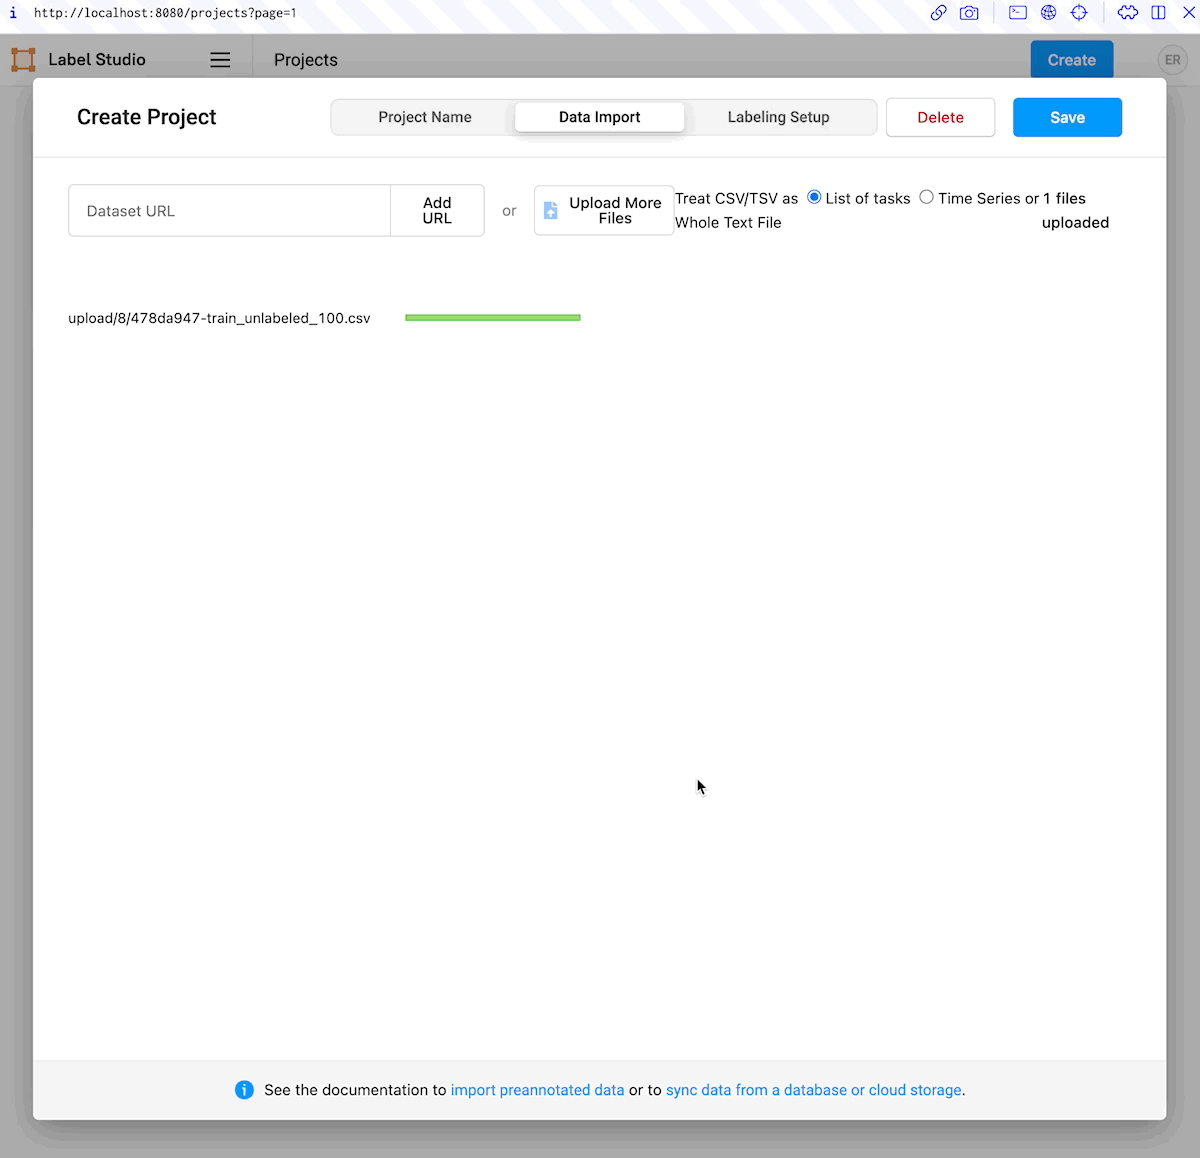
The next tab, “Data Import,” will present you with an interface to load a data set. Label Studio offers two options for loading data. You can upload data directly to the application, or connect Label Studio to your cloud storage. Cloud storage has many advantages, including automatic updating and additional data security. However, for this tutorial we will use the direct upload option.
- Download this csv file:
- Select the “Upload Files” button, and follow the dialogue to upload the `IMDB_train_unlabeled_100.csv` file that you just downloaded.
- When prompted, choose “Treat CSV/TSV as List of tasks” to import each line of the data file as a unique data item for labeling.
A future tutorial will revisit the data import dialogue, where you will add additional pre-annotated data to this initial modest data set to learn more about machine learning integrations.
Setting up the Labeling Interface
In the next tab, titled “Labeling Setup,” you’ll prepare the interface for set up.
What is the Labeling Interface, and why is it important to set it up?
The Labeling Interface is the screen where data labels and annotators will actually conduct the labeling process. In this screen, annotators will review the data and select the specific annotations to add.
Label Studio provides you with a library of templates to get up and running in the Labeling Interface, no coding or hours spent customizing it required. These include computer vision, audio/speech processing, conversational AI, NLP and many more — there are plenty of templates for you to get started with. In addition to the defaults offered by Label Studio, the Label Studio community has curated a complete library of templates that you can browse and try out in the Label Studio Playground.
Thanks to the use of XML-like tags, similar to writing HTML and CSS, you can customize the Labeling Interface to better fulfill your needs. In addition to these customizations, many data labeling teams choose to add on additional instructions to guide labelers, or give them more context about the data set.
Preparing the labeling interface for sentiment analysis
When setting up the labeling interface for our tutorial, we’ll set it up for an NLP-type of data annotation, sentiment analysis.
Select “Natural Language Processing” from the left side of the dialog, then select the “Text Classification” template. You’ll be presented with a split-pane view to help you configure your labeling interface. On the left is an automatically generated visual editor that allows you to choose which columns of the data you want to label, and create a set of labels that you can assign to each data point. If you need more control over what your labeling interface looks like, you can switch to a code editor that allows you to directly edit the XML-template.
On the right side of the split-pane is a UI preview of the labeling interface, which allows you to evaluate exactly what interface your labelers will be working with.
You will need to adjust the interface to do two things. The first is to create the appropriate labels for this project.
Sentiment analysis usually tends to have a range in intensity of an emotion or feeling that someone might be conveying. For example, stubbing your toe, on average, creates less discomfort than breaking your arm. In this case what we’re labeling is if the viewer either liked the movie or didn’t. If you were looking to gain more information from your data and train a model across a wider range of sentiments, you could add additional options such as: “informational,” “sad,” “angry,” “happy,” or “not interested.”
Since the original dataset already includes labels with only two sentiments, “Positive” and “Negative”, you will want to follow the convention set by the data set authors. The chosen template contains three sentiments, “Positive,” “Negative,” and “Neutral.” Delete the “Neutral” sentiment by clicking on the red ‘x’ next to it in the visual editor.
The next item you will need to adjust is the data that is presented in the interface to label. Recall that the data set has several columns, many of which are metadata associated with the data set. You will want to set the interface to show the “review” field of the data to the labeler. Do this by selecting “$review” from the “Use data from field” option under the “configure data” header in the visual editor.
Confirm that interface is configured the way you want it, then click “Save” in the upper-right hand corner of the dialog. Your data has been imported and your labeling interface is ready to use!
Overall, what options you have in your interface largely depends on your project requirements. Your business application, model, and data types will be major factors in determining how the interface will be set up for your data annotators.
After your project is set up
After setting the project up, you’ll be presented with the Label Studio project data page. This page looks a bit overwhelming at first glance, so we’ll break it down into easy-to-digest parts.
Reviewing your imported data
Looking at the top of your screen, the top menu bar will have more detail about each of the columns in Label Studio.
Examine the data that was imported. You’ll have a name and associated data type for each column in your CSV file. This enriched data set doesn’t just include the reviews (found in the “review” column) but also information about the number of stars that the review had, a link to the movie page on IMDB, and several IDs (one assigned by Label Studio, one assigned during the data preparation, and a non-unique one from the original data set). For now you can ignore these fields, and focus on the “review” column. This data is what annotators will evaluate and assign a sentiment of either “Positive” or “Negative.”
Using Label Studio’s terminology, each row corresponds to a labeling “task.”
Review Label Studio’s Additional Metadata
The first four columns in this view contain label metadata that is used by Label Studio to measure the progress and effectiveness of the labeling team. These include the data ID, the date labeling was completed, the number of annotations per task (to improve labeling accuracy you can have multiple labels on each task), the number of times an annotator has skipped a task, the total number of predictions (including from pre-labeled sets or ML labeled tasks), and who has labeled the data in the task.
This top row of information is adjustable, allowing you to customize the view that you see by clicking and dragging the menu bar items (much like in Excel or Google Sheets).
Time to Label some Data!
Now that we’ve got our data imported, the interface set up, we can start labeling!
Click on the bright blue `Label All Tasks` button at the center of tool bar to enter the labeling interface. You’ll then be presented with a screen with the label interface you defined during setup. You’ll notice that the text is drawn from the data set we imported. There will be a directive to choose from the sentiment options. To the right of the screen, there are additional buttons to “Skip” or “Submit” an annotation.
Using your judgment, you can select the sentiment of the text and choose “Submit” to move on to the next labeling task. Within this particular interface you can speed up your annotations with the keyboard shortcuts listed next to the annotation options, in this case ‘1’ for ‘Positive’ and ‘2’ for ‘Negative.’ If you’re unsure of the sentiment to apply to the text, just select “Skip” to move to the next task.
Without further ado — label away!
Exporting your data
Fast forward in time and you’ve now completed the 100 pieces of data in the sample dataset. You can return to the data page by selecting the project title from interface toolbar. With the labeling job completed, you can export this data to use in the rest of your machine learning or data science pipeline.
Label Studio supports various formats. For text-based data akin to what we worked with today, the options include JSON, JSON-MIN, CSV, or TSV. If we were working with a dataset that included images, object detection, or numerical data, our export options would slightly differ. For non-tabular data you will typically export a JSON file of the labels that includes references to the original images, video, or sound files you had your team label.
To keep things simple, you’ll export your labeled data as a CSV file.
In the interface, select the “Export” button. Then select “CSV” as the export format. Select the “Export” button at the bottom of the dialogue, and you will be prompted to save the exported data to your local disc.

What is exported data good for?
Exported data can be used in a multitude of ways — to speed up a classification in further data analysis, provide more accurate feedback to train a model, or even to make cumbersome tasks like search or trend prediction easier. Integrations with cloud data storage options and other DevOps tools and processes through our API allow further flexibility in use cases and annotations.
Let’s review
In this tutorial, we’ve covered the basics of data labeling, how to get started with Label Studio, what role data labeling plays in the larger machine learning ecosystem, and how to get started yourself with a basic sentiment analysis project. Now that you’ve got the basics down — you’re equipped with the skills to provide better quality data.
In the next tutorial we’ll explore the basics of machine learning, and show you how to integrate machine learning models with Label Studio. The machine learning API in Label Studio can use models to assist your team with automated labeling, train new models, or improve upon existing models as data is labeled.
Itching to get your hands dirty with more before then? Join the Label Studio Slack Community to meet other folks using and building in the data labeling space or to get a hand along your data labeling journey. Or check out the Label Studio blog where you can find more information about Label Studio, what we’ve been up to and how to get involved with various projects and initiatives that we’ve been working on.
About the Data
The dataset used for this tutorial was derived from the “Large Movie Review Dataset,” a collection of 100,000 movie reviews. The original dataset is divided into two main categories, training data and testing data. Within each category, there are 25,000 data points labeled with “positive” or “negative” sentiment. The training data set also includes an additional 50,000 unlabeled data points. Each review is stored as an individual text file, with metadata encoded into the file name, directory structure, and additional sidecar files.
To prepare the data for this tutorial, we wrote a script that walked the directory structure to capture the data and metadata as rows of data. The data was written in randomized batches with rows corresponding to:
- 0 - 25,000: Labeled training data, with positive and negative sentiment mixed.
- 25,001 - 75000: Unlabeled training data.
- 75001 - 100,000: Labeled testing data, with positive and negative sentiment mixed.
These batches were also written out as separate files for convenience. Finally, the first 100 rows of each batch were written out as separate files to support faster loading for a streamlined learning experience. Our thanks to Andrew Maas at the Special Projects Group at Apple for having provided this free data set from their research.
Andrew L. Maas, Raymond E. Daly, Peter T. Pham, Dan Huang, Andrew Y. Ng, and Christopher Potts. (2011). Learning Word Vectors for Sentiment Analysis. The 49th Annual Meeting of the Association for Computational Linguistics (ACL 2011).: “Learning Word Vectors for Sentiment Analysis”
Related Content
-
Getting Started with Sentiment Analysis
Sentiment analysis provides consistent, data-driven insights for businesses looking to better understand their users and products. Here’s how to get started.

Label Studio Team
July 11, 2022
-

Natural Language Annotation & Cloud Storage Integration
Learn how to annotate text and configure LabelStudio version 1.0.1 for cloud storage integration.
-
How To Build Custom Frontends with Label Studio
A long requested comprehensive overview of an important Label Studio feature, building custom frontends.