Sync data from external storage
Integrate popular cloud and external storage systems with Label Studio to collect new items uploaded to the buckets, containers, databases, or directories and return the annotation results so that you can use them in your machine learning pipelines.
Set up the following cloud and other storage systems with Label Studio:
If something goes wrong, check the troubleshooting section.
How external storage connections and sync work
You can add source storage connections to sync data from an external source to a Label Studio project, and add target storage connections to sync annotations from Label Studio to external storage. Each source and target storage setup is project-specific. You can connect multiple buckets, containers, databases, or directories as source or target storage for a project.
Source storage
Label Studio does not automatically sync data from source storage. If you upload new data to a connected cloud storage bucket, sync the storage connection using the UI to add the new labeling tasks to Label Studio without restarting. You can also use the API to set up or sync storage connections. See Label Studio API and locate the relevant storage connection type.
Task data synced from cloud storage is not stored in Label Studio. Instead, the data is accessed using a URL. You can also secure access to cloud storage using cloud storage credentials. For details, see Secure access to cloud storage.
Source storage permissions
If you enable the “Treat every bucket object as a source file” option, Label Studio backend will only need LIST permissions and won’t download any data from your buckets.
If you disable this option in your storage settings, Label Studio backend will require GET permissions to read JSON files and convert them to Label Studio tasks.
When your users access labeling, the backend will attempt to resolve URI (e.g., s3://) to URL (https://) links. URLs will be returned to the frontend and loaded by the user’s browser. To load these URLs, the browser will require HEAD and GET permissions from your Cloud Storage. The HEAD request is made at the beginning and allows the browser to determine the size of the audio, video, or other files. The browser then makes a GET request to retrieve the file body.
Target storage
When annotators click Submit or Update while labeling tasks, Label Studio saves annotations in the Label Studio database.
If you configure target storage, annotations are sent to target storage after you click Sync for the configured target storage connection. The target storage receives a JSON-formatted export of each annotation. See Label Studio JSON format of annotated tasks for details about how exported tasks appear in target storage.
You can also delete annotations in target storage when they are deleted in Label Studio. See Set up target storage connection in the Label Studio UI for more details.
Target storage permissions
To use this type of storage, you must have PUT permission, and DELETE permission is optional.
Amazon S3
Connect your Amazon S3 bucket to Label Studio to retrieve labeling tasks or store completed annotations.
For details about how Label Studio secures access to cloud storage, see Secure access to cloud storage.
Configure access to your S3 bucket
Before you set up your S3 bucket or buckets with Label Studio, configure access and permissions. These steps assume that you’re using the same AWS role to manage both source and target storage with Label Studio. If you only use S3 for source storage, Label Studio does not need PUT access to the bucket.
- Enable programmatic access to your bucket. See the Amazon Boto3 configuration documentation for more on how to set up access to your S3 bucket.
note
A session token is only required in case of temporary security credentials. See the AWS Identity and Access Management documentation on Requesting temporary security credentials.
- Assign the following role policy to an account you set up to retrieve source tasks and store annotations in S3, replacing
<your_bucket_name>with your bucket name:{ "Version": "2012-10-17", "Statement": [ { "Sid": "VisualEditor1", "Effect": "Allow", "Action": [ "s3:ListBucket", "s3:GetObject", "s3:PutObject", "s3:DeleteObject" ], "Resource": [ "arn:aws:s3:::<your_bucket_name>", "arn:aws:s3:::<your_bucket_name>/*" ] } ] }
note
"s3:PutObject" is only needed for target storage connections, and "s3:DeleteObject" is only needed for target storage connections in Label Studio Enterprise where you want to allow deleted annotations in Label Studio to also be deleted in the target S3 bucket.
- Set up cross-origin resource sharing (CORS) access to your bucket, using a policy that allows GET access from the same host name as your Label Studio deployment. See Configuring cross-origin resource sharing (CORS) in the Amazon S3 User Guide. Use or modify the following example:
[
    {
        "AllowedHeaders": [
            "*"
        ],
        "AllowedMethods": [
            "GET"
        ],
        "AllowedOrigins": [
            "*"
        ],
        "ExposeHeaders": [
            "x-amz-server-side-encryption",
            "x-amz-request-id",
            "x-amz-id-2"
        ],
        "MaxAgeSeconds": 3000
    }
]
Set up connection in the Label Studio UI
After you configure access to your S3 bucket, do the following to set up Amazon S3 as a data source connection:
- Open Label Studio in your web browser.
- For a specific project, open Settings > Cloud Storage.
- Click Add Source Storage.
- In the dialog box that appears, select Amazon S3 as the storage type.
- In the Storage Title field, type a name for the storage to appear in the Label Studio UI.
- Specify the name of the S3 bucket, and if relevant, the bucket prefix to specify an internal folder or container.
- Adjust the remaining parameters:
- In the File Filter Regex field, specify a regular expression to filter bucket objects. Use
.*to collect all objects. - In the Region Name field, specify the AWS region name. For example
us-east-1. - (Optional) In the S3 Endpoint field, specify an S3 endpoint if you want to override the URL created by S3 to access your bucket.
- In the Access Key ID field, specify the access key ID of the temporary security credentials for an AWS account with access to your S3 bucket.
- In the Secret Access Key field, specify the secret key of the temporary security credentials for an AWS account with access to your S3 bucket.
- In the Session Token field, specify a session token of the temporary security credentials for an AWS account with access to your S3 bucket.
- (Optional) Enable Treat every bucket object as a source file if your bucket contains BLOB storage files such as JPG, MP3, or similar file types. This setting creates a URL for each bucket object to use for labeling. Leave this option disabled if you have multiple JSON files in the bucket with one task per JSON file.
- (Optional) Enable Recursive scan to perform recursive scans over the bucket contents if you have nested folders in your S3 bucket.
- Choose whether to disable Use pre-signed URLs. For example, if you host Label Studio in the same AWS network as your storage buckets, you can disable presigned URLs and have direct access to the storage using
s3://links. - Adjust the counter for how many minutes the pre-signed URLs are valid.
- In the File Filter Regex field, specify a regular expression to filter bucket objects. Use
- Click Add Storage.
After adding the storage, click Sync to collect tasks from the bucket, or make an API call to sync import storage.
Set up target storage connection in the Label Studio UI
After you configure access to your S3 bucket, do the following to set up Amazon S3 as a target storage connection:
- Open Label Studio in your web browser.
- For a specific project, open Settings > Cloud Storage.
- Click Add Target Storage.
- In the dialog box that appears, select Amazon S3 as the storage type.
- In the Storage Title field, type a name for the storage to appear in the Label Studio UI.
- Specify the name of the S3 bucket, and if relevant, the bucket prefix to specify an internal folder or container.
- Adjust the remaining parameters:
- In the Region Name field, specify the AWS region name. For example
us-east-1. - (Optional) In the S3 Endpoint field, specify an S3 endpoint if you want to override the URL created by S3 to access your bucket.
- In the Access Key ID field, specify the access key ID of the temporary security credentials for an AWS account with access to your S3 bucket.
- In the Secret Access Key field, specify the secret key of the temporary security credentials for an AWS account with access to your S3 bucket.
- In the Session Token field, specify a session token of the temporary security credentials for an AWS account with access to your S3 bucket.
- In the Region Name field, specify the AWS region name. For example
- Click Add Storage.
After adding the storage, click Sync to collect tasks from the bucket, or make an API call to sync export storage.
Add storage with the Label Studio API
You can also create a storage connection using the Label Studio API.
- See Create new import storage then sync the import storage.
- See Create export storage and after annotating, sync the export storage.
Google Cloud Storage
Dynamically import tasks and export annotations to Google Cloud Storage (GCS) buckets in Label Studio. For details about how Label Studio secures access to cloud storage, see Secure access to cloud storage.
Prerequisites
To connect your GCS bucket with Label Studio, set up the following:
- Enable programmatic access to your bucket. See Cloud Storage Client Libraries in the Google Cloud Storage documentation for how to set up access to your GCS bucket.
- Set up authentication to your bucket. Your account must have the Service Account Token Creator and Storage Object Viewer roles and storage.buckets.get access permission. See Setting up authentication and IAM permissions for Cloud Storage in the Google Cloud Storage documentation.
- If you’re using a service account to authorize access to the Google Cloud Platform, make sure to activate it. See gcloud auth activate-service-account in the Google Cloud SDK: Command Line Interface documentation.
Set up connection in the Label Studio UI
In the Label Studio UI, do the following to set up the connection:
- Open Label Studio in your web browser.
- For a specific project, open Settings > Cloud Storage.
- Click Add Source Storage.
- In the dialog box that appears, select Google Cloud Storage as the storage type.
- In the Storage Title field, type a name for the storage to appear in the Label Studio UI.
- Specify the name of the GCS bucket, and if relevant, the bucket prefix to specify an internal folder or container.
- Adjust the remaining optional parameters:
- In the File Filter Regex field, specify a regular expression to filter bucket objects. Use
.*to collect all objects. - Enable Treat every bucket object as a source file if your bucket contains BLOB storage files such as JPG, MP3, or similar file types. This setting creates a URL for each bucket object to use for labeling, such as
gs://my-gcs-bucket/image.jpg. Leave this option disabled if you have multiple JSON files in the bucket with one task per JSON file. - Choose whether to disable Use pre-signed URLs. For example, if you host Label Studio in the same network as your storage buckets, you can disable presigned URLs and have direct access to the storage.
- Adjust the counter for how many minutes the pre-signed URLs are valid.
- In the File Filter Regex field, specify a regular expression to filter bucket objects. Use
- In the Google Application Credentials field, add a JSON file with the GCS credentials you created to manage authentication for your bucket. You can also use the
GOOGLE_APPLICATION_CREDENTIALSenvironment variable to specify this file. For example:export GOOGLE_APPLICATION_CREDENTIALS=json-file-with-GCP-creds-23441-8f8sd99vsd115a.json - Click Add Storage.
- Repeat these steps for Target Storage to sync completed data annotations to a bucket.
After adding the storage, click Sync to collect tasks from the bucket, or make an API call to sync import storage.
Add storage with the Label Studio API
You can also create a storage connection using the Label Studio API.
- See Create new import storage then sync the import storage.
- See Create export storage and after annotating, sync the export storage.
Microsoft Azure Blob storage
Connect your Microsoft Azure Blob storage container with Label Studio. For details about how Label Studio secures access to cloud storage, see Secure access to cloud storage.
Prerequisites
You must set two environment variables in Label Studio to connect to Azure Blob storage:
AZURE_BLOB_ACCOUNT_NAMEto specify the name of the storage account.AZURE_BLOB_ACCOUNT_KEYto specify the secret key for the storage account.
Configure the specific Azure Blob container that you want Label Studio to use in the UI.
Set up connection in the Label Studio UI
In the Label Studio UI, do the following to set up the connection:
- Open Label Studio in your web browser.
- For a specific project, open Settings > Cloud Storage.
- Click Add Source Storage.
- In the dialog box that appears, select Microsoft Azure as the storage type.
- In the Storage Title field, type a name for the storage to appear in the Label Studio UI.
- Specify the name of the Azure Blob container, and if relevant, the container prefix to specify an internal folder or container.
- Adjust the remaining optional parameters:
- In the File Filter Regex field, specify a regular expression to filter bucket objects. Use
.*to collect all objects. - In the Account Name field, specify the account name for the Azure storage. You can also set this field as an environment variable,
AZURE_BLOB_ACCOUNT_NAME. - In the Account Key field, specify the secret key to access the storage account. You can also set this field as an environment variable,
AZURE_BLOB_ACCOUNT_KEY. - Enable Treat every bucket object as a source file if your bucket contains BLOB storage files such as JPG, MP3, or similar file types. This setting creates a URL for each bucket object to use for labeling, for example
azure-blob://container-name/image.jpg. Leave this option disabled if you have multiple JSON files in the bucket with one task per JSON file. - Choose whether to disable Use pre-signed URLs, or shared access signatures. For example, if you host Label Studio in the same network as your storage containers, you can disable presigned URLs and have direct access to the storage.
- Adjust the counter for how many minutes the shared access signatures are valid.
- In the File Filter Regex field, specify a regular expression to filter bucket objects. Use
- Click Add Storage.
- Repeat these steps for Target Storage to sync completed data annotations to a container.
After adding the storage, click Sync to collect tasks from the container, or make an API call to sync import storage.
Add storage with the Label Studio API
You can also create a storage connection using the Label Studio API.
- See Create new import storage then sync the import storage.
- See Create export storage and after annotating, sync the export storage.
Redis database
You can also store your tasks and annotations in a Redis database. You must store the tasks and annotations in different databases. You might want to use a Redis database if you find that relying on a file-based cloud storage connection is slow for your datasets.
Currently, this configuration is only supported if you host the Redis database in the default mode, with the default IP address.
Label Studio does not manage the Redis database for you. See the Redis Quick Start for details about hosting and managing your own Redis database. Because Redis is an in-memory database, data saved in Redis does not persist. To make sure you don’t lose data, set up Redis persistence or use another method to persist the data, such as using Redis in the cloud with Microsoft Azure or Amazon AWS.
Set up connection in the Label Studio UI
In the Label Studio UI, do the following to set up the connection:
- Open Label Studio in your web browser.
- For a specific project, open Settings > Cloud Storage.
- Click Add Source Storage.
- In the dialog box that appears, select Redis Database as the storage type.
- Update the Redis configuration parameters:
- In the Path field, specify the path to the database. Used as the keys prefix, values under this path are scanned for tasks.
- In the Password field, specify the server password.
- In the Host field, specify the IP of the server hosting the database, or
localhost. - In the Port field, specify the port that you can use to access the database.
- In the File Filter Regex field, specify a regular expression to filter database objects. Use
.*to collect all objects. - Enable Treat every bucket object as a source file if your database contains files such as JPG, MP3, or similar file types. This setting creates a URL for each database object to use for labeling. Leave this option disabled if you have multiple JSON files in the database, with one task per JSON file.
- Click Add Storage.
- Repeat these steps for Target Storage to sync completed data annotations to a database.
After adding the storage, click Sync to collect tasks from the database, or make an API call to sync import storage.
Add storage with the Label Studio API
You can also create a storage connection using the Label Studio API.
- See Create new import storage then sync the import storage.
- See Create export storage and after annotating, sync the export storage.
Local storage
If you have local files that you want to add to Label Studio from a specific directory, you can set up a specific local directory on the machine where LS is running as source or target storage. Label Studio steps through the directory recursively to read tasks.
Prerequisites
Add these variables to your environment setup:
LABEL_STUDIO_LOCAL_FILES_SERVING_ENABLED=trueLABEL_STUDIO_LOCAL_FILES_DOCUMENT_ROOT=/home/user(orLABEL_STUDIO_LOCAL_FILES_DOCUMENT_ROOT=C:\\data\\mediafor Windows).
Without these settings, Local storage and URLs in tasks that point to local files won’t work. Keep in mind that serving data from the local file system can be a security risk. See Set environment variables for more about using environment variables.
Set up connection in the Label Studio UI
In the Label Studio UI, do the following to set up the connection:
- Open Label Studio in your web browser.
- For a specific project, open Settings > Cloud Storage.
- Click Add Source Storage.
- In the dialog box that appears, select Local Files as the storage type.
- In the Storage Title field, type a name for the storage to appear in the Label Studio UI.
- Specify an Absolute local path to the directory with your files. The local path must be an absolute path and include the
LABEL_STUDIO_LOCAL_FILES_DOCUMENT_ROOTvalue.
For example, ifLABEL_STUDIO_LOCAL_FILES_DOCUMENT_ROOT=/home/user, then your local path must be/home/user/dataset1. For more about that environment variable, see Run Label Studio on Docker and use local storage. - (Optional) In the File Filter Regex field, specify a regular expression to filter bucket objects. Use
.*to collect all objects. - (Optional) Toggle Treat every bucket object as a source file.
- Enable this option if you want to create Label Studio tasks from media files automatically, such as JPG, MP3, or similar file types. Use this option for labeling configurations with one source tag.
- Disable this option if you want to import tasks in Label Studio JSON format directly from your storage. Use this option for complex labeling configurations with HyperText or multiple source tags.
- Click Add Storage.
- Repeat these steps for Add Target Storage to use a local file directory for exporting.
After adding the storage, click Sync to collect tasks from the bucket, or make an API call to sync import storage.
Tasks with local storage file references
In cases where your tasks have multiple or complex input sources, such as multiple object tags in the labeling config or a HyperText tag with custom data values, you must prepare tasks manually.
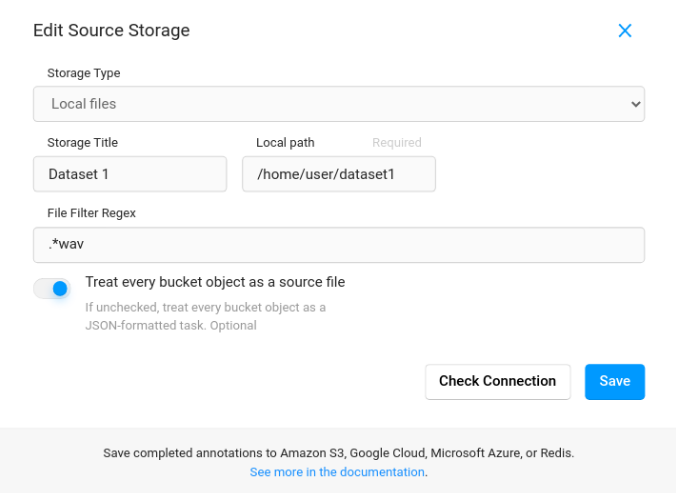
In those cases, you have to repeat all stages above to create local storage, but skip optional stages. Your Absolute local path have to lead to directory with files (not tasks) that you want to include by task, it also can contain other directories or files, you will specified them inside task.
Differences with instruction above:
- 7. File Filter Regex - stay empty (because you will specify it inside tasks)
- 8. Treat every bucket object as a source file - switch off (because you will specify it inside tasks)
Your window will look like this:
Click Add Storage, but not use synchronization (don’t touch button Sync Storage) after storage creation, to avoid automatic task creation from storage files.
Path to all your files inside task will start with string /data/local-files/?d=, also you have to add to this string full path to each file, that start from the first directory in Absolute local path of local storage after your LABEL_STUDIO_LOCAL_FILES_DOCUMENT_ROOT. In our example it is dataset1. For example, to specify multiple data types in the Label Studio JSON format, specifically an audio files 1.wav, 2.wav inside audio folder and an image files 1.jpg, 2.jpg inside images folder:
[{
 "id": 1,
 "data": {
    "audio": "/data/local-files/?d=dataset1/audio/1.wav",
    "image": "/data/local-files/?d=dataset1/images/1.jpg"
  }
},
{
 "id": 2,
 "data": {
    "audio": "/data/local-files/?d=dataset1/audio/2.wav",
    "image": "/data/local-files/?d=dataset1/images/2.jpg"
  }
}]
There are several ways to add your hand made task: API, web interface, another storage. The simplest one is to use Import button inside project main page. Drag and drop your json file inside window, after this push blue button Import.
Add storage with the Label Studio API
You can also create a storage connection using the Label Studio API.
- See Create new import storage then sync the import storage.
- See Create export storage and after annotating, sync the export storage.
Set up local storage with Docker
If you’re using Label Studio in Docker, you need to mount the local directory that you want to access as a volume when you start the Docker container. See Run Label Studio on Docker and use local storage.
Local Storage with Custom Task Format
This video tutorial demonstrates how to setup Local Storage from scratch and import json tasks in a complex task format that are linked to the Local Storage files.
Troubleshoot CORS and access problems
Troubleshoot some common problems when using cloud or external storage with Label Studio.
I can’t see the data in my tasks
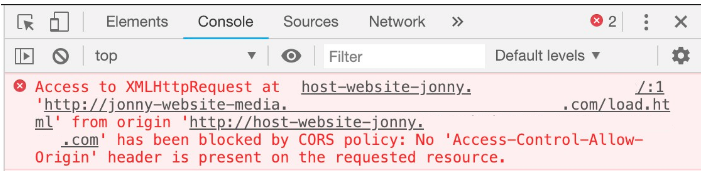
Check your web browser console for errors.
- If you see CORS problems, make sure you have CORS set up properly.
- For Amazon S3, see Configuring and using cross-origin resource sharing (CORS) in the Amazon S3 User Guide.
- For GCS, see Configuring cross-origin resource sharing (CORS) in the Google Cloud Storage documentation.
- For Microsoft Azure, see Cross-Origin Resource Sharing (CORS) support for Azure Storage in the Microsoft Azure documentation.
note
-
Make sure to apply the correct role and permissions for your Service Account. For example, Service Account Role "roles/iam.serviceAccountTokenCreator" to the Service Account.
-
If the name of the Service Account
labelstudiois using the error displayed in the DEBUG logs, then you can enable them using the--log-level DEBUGflag in thelabel-studio startcommand.
- If you see 403 errors, make sure you configured the correct credentials.
- For Amazon S3, see Configuration and credential file settings in the Amazon AWS Command Line Interface User Guide.
- For GCS, see Setting up authentication in the Google Cloud Storage documentation. Your account must have the
Service Account Token Creatorrole.
- For Amazon S3, make sure you specified the correct region when creating a bucket. If needed, change the region in your source or target storage settings or the
.aws/configfile, otherwise you might have problems accessing your bucket objects.
For example, update the following:~/.aws/config[default] region=us-east-2 # change to the region of your bucket - For Amazon S3, make sure that the credentials that you used to set up the source or target storage connection are still valid. If you see 403 errors in the browser console, and you set up the correct permissions for the bucket, you might need to update the Access Key ID, Secret Access Key, and Session ID. See the AWS Identity and Access Management documentation on Requesting temporary security credentials.
Tasks or annotations do not sync
If you’re pressing the Sync button but tasks do not sync, or you can’t see the new tasks in the Data Manager, check the following:
- Make sure you specified the correct credentials.
- For Amazon S3, see Configuration and credential file settings in the Amazon AWS Command Line Interface User Guide. Also be sure to check that they work from the aws client.
- For GCS, see Setting up authentication in the Google Cloud Storage documentation. Your account must have the Service Account Token Creator and Storage Object Viewer roles and storage.buckets.get access permission. See Setting up authentication and IAM permissions for Cloud Storage in the Google Cloud Storage documentation. Also, if you’re using a service account to authorize access to the Google Cloud Platform, make sure to activate it. See gcloud auth activate-service-account in the Google Cloud SDK: Command Line Interface documentation.
- Make sure that files exist under the specified bucket or container prefix, and that your file filter regex matches the files. When you set the prefix, subfolders are not recursively scanned.
Tasks don’t load the way I expect
If the tasks sync to Label Studio but don’t appear the way that you expect, maybe with URLs instead of images or with one task where you expect to see many, check the following:
- If you’re placing JSON files in cloud storage, place 1 task in each JSON file in the storage bucket. If you want to upload a JSON file from local storage into Label Studio, you can place multiple tasks in one JSON file.
- If you’re syncing image or audio files, make sure Treat every bucket object as a source file is enabled.